Tuesday, August 14, 2012

How to Make Juicy Sweet Corn

Corn is such an awesome vegetable, it is one of the few veges that my kids will eat.  I did some research and found that I have been cooking my corn the wrong way.  Here is what I end up doing, combining several different tips from experts. Hope you will try it and taste the difference!

1. Boil water in a large stock pot.  DO NOT PUT SALT

2. Remove Husk and break into half and place into boiling water and cover with a lid.  I have 6 ears of corn here.

3. Cook for 10 minutes only

4. Add 2 tbs of butter into boiled corn and let it melt

5. Shred 2 cups of Cheddar Cheese


6. Remove Corn from water and put a chopstick as holder


7. While corn is still hot, sprinkle cheddar cheese on top

Placing butter into the water will save you a step from doing it yourselves.  Especially when you are making corn for the whole family.  Also not putting salt in the water will prevent corn from getting tough.  I never know how long corn should cook for, I had no idea it only takes 10 minutes. 

Hope you enjoy this recipe!  My kids and I sure did! Yumolicious!

Sunday, August 12, 2012

Hong Kong Pineapple Bun Recipe 波羅包


Tips:
Working with yeast is tricky. Some day it works well, other days, it does not want to rise. But yeast is the key to a soft and airy bun. So be patient and let it rise slowly. If the temperature and humidity is not right, dough will not rise properly. Yeast is a bacteria and needs warm air, food and warm liquid to grow. That’s why warm milk and sugar is important. Once you feed them and give them a warm place to grow, they will be happy and your bread will be nice and soft and airy. Oven temperature is important too. Make sure your oven is hot enough before placing the bun in the oven. Too hot of an oven, the bun will be burnt and the inside is not cooked enough. Oven not hot enough the bun will not rise properly. To make sure the oven is in the right temperature, invest in a oven thermometer. Lastly, invest in a scale with grams and ounce. Baking is a chemistry and needs precision. Measuring accurately will ensure consistency every time you bake. I hope these tips will help you bake. Enjoy!

Pineapple Bun Recipe

Bun Ingredients:

Make 12 mini Buns
All purpose flour(Sieved) 360g
Dry Yeast 3tsp
Salt 1tsp
Sugar 3.5tsp
Melted Butter 30g
Egg Yolk 1
Warm milk 150ml (15C or 60F)
Honey 3tsp

Cookie Top Ingredients:
Sugar 80g
Butter(Soften) 50g
Egg Yolk 2
Milk 2tsp
Honey 3tsp
All Purpose Flour(sieved) 140g
Baking Powder 2tsp

Egg Wash:
Egg White 2
Milk 5tsp


Making the Buns: Takes about 3 hrs
Place flour on a clean counter top and create a large well in the middle. In a bowl combine warm milk, yeast, sugar and honey, mix well and let stand for 10mins until bubble is form. Add yeast mixture, butter and egg yolk into flour well and slowly work from the middle, combine flour to form a dough. Keep kneading until dough is smooth and not sticky to the touch. If dough is too dry, spray with a little of water. Place dough in a large bowl, cover with wet towel and let is rest in room temperature for 1.5hr or until dough double its size. It is time to prepare cookie topping. After resting, punch dough and knead again and divide dough into 12 small balls. Place on a greased sheet pan, cover with wet towel and let rest for about 30 minutes or double the size again. Then you are ready to add cookie topping.

Making Cookie Topping:
Combine butter and sugar in a bowl and mix well. Add egg yolk, milk and honey and mix well. Add remaining dry ingredients and mix into a soft dough. Wrap dough with plastic wrap and form a cylinder tube. Place in refrigerator and refrigerate until firm. About 30mins.


Time to Bake:
Preheat oven to 350F or 180C
Cut cookie topping into 12 portions and flatten it with the palm of your hands while it is still cold. If too sticky, flatten it in between two sheets of plastic wrap. Brush buns with egg wash and place cookie on top of buns. Then brush cookie topping with egg wash. Brush again just before bun is placed in the oven. After about 15mins in the oven, rotate sheet pan for even browning. Bake until golden brown and let it cool. Cookie topping will become crispy and enjoy with a big slice of butter in the middle with bun sliced in half.


Saturday, August 11, 2012

Lazy Day Nutella Molten Lava Cake


Simple and Delicious! Lazy Day Nutella Molten Lava Cake

 There are lots of lava cake recipes out there that requires quite a bit of steps and ingredients.  It is also hard to find a recipe that does not have tons of egg yolks or butter in it.  So I did my research and made my adjustments.  Even if you over cook this cake, no big deal, it will still be the most delicious Nutella brownie you have ever tasted.  Simply cannot go wrong! Perfect for date night dessert!
Ahhh! The Simple pleasure of Nutella

Pre-heat oven at 350F or 180C. Spray cooking oil and dust with flour
Ingredients: 3 egg yolk, 1 tbs butter, 1 cup Nutella, 1 tbs flour

Mix all ingredients until smooth.  Fill ramekins 2/3 full and bake in 350F or 180C oven for about 13 mins
Remove from oven when you see a crust is formed around the rim and on top.  Let cool for 5 mins and fill in with strawberries or filling of your choice. 


Scrape the side of the cake with a knife and flip over onto a plate.  Dust with powdered sugar and serve HOT!

 YUMOLICIOUS!

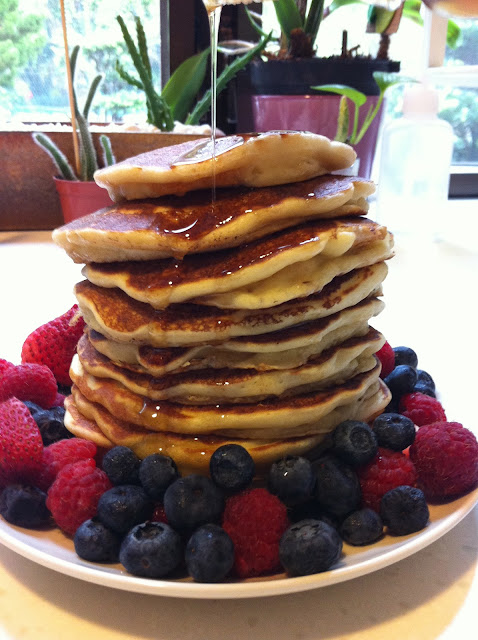
YLO's Buttermilk Pancake

Haha!!!! After researching half a dozen pancake recipe, I simplified several different version and come up with this easy to manage recipe.  

Enjoy and have a Yumolicious Breakfast!


Substitution for Buttermilk: If you don't have buttermilk, you can substitute with one cup of Yogurt, or make your own.  Add one tbs of vinegar or lemon juice to one cup of milk, do not stir and wait for 5 minutes.  It will turn into curd milk, buttermilk is basically soured milk.


Ingredients:1 cup of buttermilk, 2tbs melted butter, 1 egg, 1 cup flour, 1 tsp baking soda, 1/2 tsp salt, 1 tbs of sugar

1. Melt Butter in frying pan, reuse pan for frying pancake
2. Mix all ingredients including melted butter
3. Spoon 2 tbs of batter into low heat pan, wait for the bubbles to form.  I use the smallest flame on my stove top


4. Flip once bubbles are formed
Add Berries and 100% Maple syrup and Serve Hot!


Sunday, May 1, 2011

Secrets of making very green Pesto Sauce 意大利香蒜醬烹調方法

I started the idea of taking cooking class in different countries rather than taking a professional course at home.  My goal is to learn the most authentic way of making a local recipe.  It has so far been an amazing journey.  Besides from the Pizza and Pasta recipe that I shared, the most eye opening recipe that chef gave me was the Pesto recipe.  I have made pesto so many times, and watched chef making them, but not once I got tips like this.  Here is the recipe and I really hope you go out today and make yourself some delicious beautiful Pesto.

Ingredients:

Fresh Basil (leaves only) 150g
Ligurian extra virgin olive oil 2 cups(light flavor)
Garlic 2 cloves
Pine nuts 25g
Grated Parmesan Cheese 25g
Grated Pecorino Cheese 10g

Preparation Method:
Put the bowl of the blender into the freezer at least 30 mins before blending
Combine pine nuts, oil, garlic, Parmesan and Pecorino and blend until smooth
Add basil and ONLY blend for few second until combine. 
Put mixture in container and pour olive oil on top to prevent from browning and refrigerate until use.

Theory:
Ligurian Olive oil is one of a kind, very light in taste but leaves a peppery taste at the back of your mouth.  I have yet to see it in hk, but if you do, grab some.  Only a few garlic is used, less that what I expected.  He said they don't want the garlic to over power the basil flavor.  Pecorino is a goat's milk hard cheese, similar to Parmesan cheese but it brings citrus and sweetness to the equation.  Finally, the most important thing, a chilled blender.  When you blend, it generates heat that cook the basil and therefore will make it turn brown and loose the lush green look.  The cold blender prevents this process and also by only blending for few seconds, the pesto remains extra green.  Using olive oil to cover on top further prevents the oxidation and guarantees your pesto is both delicious and beautiful.  Chef also mentioned, pesto should never be cooked on direct heat.  It should only be added onto hot pasta.  Once you heat the basil, the flavor is not the same.  For storage, you can leave out the cheese from the recipe and put the mixture into a ice cube tray.  When you are ready to use the basil, defrost and add back the cheese into it and mix with your ingredients.

Usage:
Besides from eating it on toast, chef made this dish with adding pesto to hot pasta, boiled green beans and boiled potatoes.  He called it a vegetable dish but I joke that it is just an excuse for another pasta dish.  I also like pesto in pizza, sandwiches or use it as a salad dressing. 

Friday, April 29, 2011

Milan Cooking Class Part II: Pizza Dough 比薩製作方法

How could you take an Italian cooking class without learning how to make pizza!  The first five days in Milan, I was so in love with their breads especially their bread sticks and crackers.  When chef showed me how to make pizza, I was so amazed how easy it is and we all can make it at home as long as you have a very hot and good oven.  Goodbye pizza delivery, you can have home made thin crisp pizza in two hours.  After return from Italy, I had a create your own pizza party at home and we turned out some amazing pizza right at home.  Here is the recipe and I hope you use it to impress your kids and friends.

Ingredients:

All Purpose Flour 500g
Honey or malt 1 teaspoon
Lukewarm Water 280g
Yeast(dry or fresh) 12g
Extra Virgin Olive Oil 10g
Table salt 10g

Method:

Preheat your oven to the hightest heat 260 C or 500F Degrees.  Melt yeast, honey, olive oil in water.  Spread flour on table and create a large well in the middle. Add yeast  mixture in the well and slowly mix in flour from the inside.  When combined, add salt. mix until a dough is form and dough is smooth.  Place in a large bowl and cover with plastic wrap and place in room temperature. Let rise for an hour or double in size.  Divide dough into your desire size.  To make personal small pizza, I divided it into 8 portions.  Cover with a moist dish cloth and let rest for another 15 mins.  Dust table with flour, shape dough into a round disk and using the palm of your hand flatten it to form a think disk. Grease baking sheet with a little olive oil and place disk on top.  Then you are ready to dress your pizza. Place pizza in the oven and bake for about 7-10 minutes until crust and filling is golden brown or crisp.  Enjoy.


Theory: Make disk as thin as possible, it is ok to have a hole, don't worry, just pinch and fix it on the sheet pan.  HOT HOT oven is key!  You can make the dough a head of time and refrigerate up to two days until use, just take it out from the fridge 30mins before use.  If you find your dough too dry, add a teaspoon of water at a time and keep working.  If the dough is too wet or too sticky, add more flour on the table and keep working.  The dough should not be sticky nor flaky, it should just form a smooth dough that you can work without sticking to your hands.  Working with flour and yeast all depends on your atmosphere.  If it is the summer time, make sure your dough temperature stay within 30-50C or your yeast will die.  You can add or decrease water content depends on the humidity of the day.  Try it a couple of times and you will get your perfectly crisp pizza.

Try these combo:
Tomato sauce, fresh tomato, fresh mozzarella(Drained) and fresh basil.
4 Cheese of any kind with anchovy.
Parmesan cheese, Mozzarella, Parma Ham and top with chopped Rocket lettuce after pizza is out of the oven.
Pepperoni and mozzarella with tomato sauce and pineapple for the kids.
Nutella, marshmallow, banana slices and strawberries for a dessert pizza.


Saturday, April 9, 2011

Pasta Dough Recipe from Milan 意大利麵條的製作方法


Day 3 in Milan, I was so in love with all the pasta dishes.  Determined to make the most authentic Italian dishes at home, I booked ahead a two day Italian cooking class at La Cucina Italiana.  It is the most prestige private cooking school in town.  80% of their students are Italians and they too want to make Italian food the right way.

Add caption
After a 15 minutes walk from the hotel, I arrived at the school right next to the office of La Cucina Italiana Magazine.  Walking into a professional kitchen with a marble island in the middle, I was greeted by Chef Davide Negri, who will be my guide to a two day intensive crash course on authentic Italian staples, pastas and breads.  Born, raised and trained in Milan, Chef Negri call himself the panda of Milan, "Nobody is from Milan anymore!"  How can you get more authentic than that!

One great thing about making fresh pasta, it is basically the same recipe but you can make many different kinds of pasta.  It all starts from a very basic dough.  One special ingredient that will make this recipe authentic is the Durum flour, some people call it pasta flour, a bit yellow in color and a very strong flour. This is what make the pasta al dante! If you cannot find this, chef said to substitute with strong flour, or bread flour.
Durum Flour


Basic Fresh Pasta Dough Recipe:

200g All purpose flour
50g Durum flour (Strong flour)
2 Eggs
2 Egg yolks
1 tsp Extra Virgin olive oil (light flavored ones)
pinch of salt

Method:
Mix both flour together and create a big well in the middle.
Add remaining ingredients into the well.
Start from the middle, slowly mix liquid into flour until a dough is form.  Knead about 8-10mins.  Dough should be moist, soft but not too sticky.  If it is too dry, spray in a little water.
Cover with plastic wrap and let it rest at room temperature for one hour.  Cut dough into smaller size to fit into pasta machine
Starting with the widest setting of the pasta machine insert dough.  Sprinkle flour on dough before you insert into machine if it is sticky.  Insert dough through machine and decrease setting each time for about 4-5 times.  If the dough is too thin, fold in half and insert again into the machine
Stop at about 1/16 inch or second to the thinest setting and it should be thin enough for most pasta.

Theory:
I made this recipe at home and find it a bit dry. So if your eggs are too small or maybe it is a dry day, add a little more left over egg white to the dough until dough is smooth.  I find a spray bottle with water also handy, give it s spritz and slowly work on it.  Towards the end the dough might seem hard to knead, it is perfect, you want it to be hard so it will be el dante.  The dough should also be just dry enough and not stick to you hands.  If you want to make color pasta, just substitute the volume of one egg with either cooked chopped spinich, tomato paste or squid ink.  You can even make chocolate pasta by adding some coco powder.  You might need a little extra moisture with that dough. 

Tagliatelle:
Let pasta sheet dry for about 10 mins to prevent from sticking, roll it up loosely and cut into 1/4 inch strips.  Pasta can be kept in fridge covered with plastic wrap for up to about three days.

Lasagna:
Cut into squares or your desired shapes.  Boiled in salt water for about 3 mins and run through cold water.  Then add sauces and ingredients to make 5 layers and put into oven until sauce is hot.  No need to cook for a long time since noodles are already cooked

Raviolis:
Using a long pasta sheet, fold into half and make a line in the middle.
Brush a small amount of water onto the small half of the sheet, just enough for it to stick.
Pipe your fillings about one inch apart onto the smaller half sheet.
Fold the larger half of the sheet over, covering the fillings.
Press in between fillings to remove air and seal in the fillings within the pasta sheets.
Cut sheets with knife or pasta cutter and raviolis are ready to be cooked
Cook in a large pot of salted water for about 2-3 minutes, mix with your favorite sauce and serve!

Try this at home and let me know how it turns out!
Spinach Ricotta Raviolis with Sage Butter sauce