Sunday, December 9, 2012

Avengers Cake with Thor, The Incredible Hulk, Captain America and IronMan

My friend ask me to do a cake for his Son's 7th birthday party and gave me this picture as a guide!!!! This picture is from Cake with Love from Florida.  My first reaction is Crap!!!


This is a fondant cake and I said I don't make fondant cake, so this is my compromise!  A three tier 10 lbs Italian Butter Cream Vanilla butter cake. There were tons of challenges here and I learned a great deal from this project.

Cake was 3 tiers of 8 inch x 6 inch x 4 inch with four layers each.  14 inches tall including Thor's hammer.  A new product I use is the sugar sheets from Wilton.  I used this paper like sheets to create the hair of The Hulk.  It was so easy and I gave him a nice haircut.


Captain America Shield


This Captain America shield was fun.  Instead of stacking one circle on top of each other.  I choose to cut and in lay the circles making it flat like a shield.  I quite like this.  


Iron man mask was tough!  I couldn't really find anything I like as reference so I made this one based on a few image combined and gave him a cartoony eyes.  

Another major challenge was stacking the cake without making the color transferring to the other tier.  Also the shields and the mask was heavy and I had trouble attaching it to the cake without it sliding off.  If you have any suggestions, please let me know!  

But overall, this is an Avengers kind of a project!  Happy Birthday Jonathan!

Friday, November 23, 2012

Italian Butter Cream Wedding Cake Part II

I am relieved yet excited that my wedding cake was a huge success.  The wedding couple was very happy with the design and most of all it was a delicious cake that everyone enjoyed.

I just wanted to recap how I decorate the cake.  I used fresh flowers to decorate the cake.  The couple wanted me to use baby's breath and Pink Hydrangea to decorate the cake.  Since these are all small little flowers, it might not stay fresh for long periods of time.  So I make sure to soak them in water at least overnight and make sure they are fresh and wait till the last minute to assemble it onto the cake.  Soaking it also prevent excess dirt or pesticide from transferring to the cake. 


First step, I made the cake topper.  I twist several 20 gauge wire into the bride and groom initials M and C.  I surrounded the initials with wet cotton.  Then using very fine silver wires, I secure little pieces of Baby's breath onto a initials. 

Then I cut bits and pieces of Hydrangeas and place them loosely around the cake giving it an accent of light pink.  I also place a thin off white ribbon on the base of each layer.  But next time, I would prefer to use a thicker ribbon or fondant to surround the cake and use colors that will match with the flowers.  I did not want to have too much flowers around the cake.  Simple and intimate was what I have in mind. 


So the cake is done, it is not over!  The worse part is yet to come.  DELIVERING the cake is next.  In Hong Kong, we don't have office depot.  It was very hard for me to find a huge sturdy and clean box for my cake.  I need a 18x18x18 box to house my cake.  So finally I went to the post office and found myself a box that will hold 50lbs of goods.  The postman was shocked when he found out I was using it to transport a cake! 

I carefully place non skid mats in the box.  Then I place my cake on a sheet pan and another mat to make sure my cake is not going anywhere during the journey.  Then I place it in and closing the box and carefully place it in the trunk of my car!

I was driving so slow the whole time and next time, I will put a sign on my rear window delivering a wedding cake so people won't kill me on the road.  I was so worried that the cake will move or tip over.  Well everything went perfectly.  30minutes later the cake and I arrived to the venue safely. 

Well, a week later and I still have some nightmares about broken wedding cakes.  Else than that, I am already having other ideas to make different style of wedding cakes.  So let me know if we can help!  

Thursday, November 15, 2012

Making a Pink Hydrangeas Italian Butter Cream Wedding Cake Part 1

It is November and all of a sudden I am knee deep with cakes and catering.  Today I am working on a wedding cake for a very nice couple.  Since I have been avoiding baking for the last 15 months because of school, it is refreshing again to do such a project.  People always say you have such steady hands beautiful design but I realize practice makes perfect.  For those of you who follow my fb and instagram, you will know I have been piping a lot of ruffles on my cake.  I have also started doing some sugar gum paste figurines.  All these techniques that I learn from my Wilton cake decorating class finally paid off.  Besides from practice, I also learn lots of good stuff on youtube and get ideas from google images.  How to stack a cake, how to transport a cake, how to fix icing....the list goes on.  I also took a year worth of classes from Greenfingers Florist and learn so much about putting a bouquet together, the architecture of floral arrangements and how to handle flowers. 

Today is a project that utilize both my floral arrangement skills and my baking and cake decorating experience.  I am making a 25lb Wedding cake with my favourite combo.  French Vanilla Italian Butter Cream, Rich Chocolate Cake and Lemon zest Vanilla Butter Cake.  The couple ask me if I can do a simple design with just flower and smooth finish, I was really worried I would mess things up.  It might look easy with no piping at all but I think it is the most difficult task to make a simple yet beautiful cake.  There are no room for error.  Everything has to be perfect, every level has to match and the icing has to be smooth as ice.  I said I would try and I want to share my experience with you all. 

My cake is about 25lb feed100ppl, I used 4 batches of Vanilla Cake for my 12 inch bottom layer.  Then 1.5 batches chocolate for my 9inch middle and 1 batch for my 6inch top.  I also use 5 batches of my Italian Butter Cream.  I used a 2 16" cake foam and cardboard and I covered it with off white fondant.  I did not use sugar flowers this time and tomorrow I will be assembling my cake topper and the pink Hydrangeas around it.  I want to make sure my flowers are nice and fresh!

I fell in love with Italian butter cream because it is delicious and so smooth to work with.  It makes everything look so smooth, soft and elegant with a glow.  With some practice, we can do beautiful natural designs without the extra cost of fondant.  It is such a waste to see people pay for fondant and nobody except my 4 years old will eat it, especially in Hong Kong.  So why pay for something you will throw away, why not choose a cake that is both delicious and beautiful.  It can happen!

Just smoothed cake before refrigeration overnight


Italian Butter Cream does not dry, so I have to refrigerate to get it solid enough for me to smooth.  I first layer my cakes into equal thickness, then I pipe my icing using a large flat tip in between each layers to maintain similar thickness of icing.  With everything remain the same, my three tiers of cake come out to be exactly 4 inch high each!

I crumb the exterior of the cake by spreading a really thin layer of icing evenly around the cake, catching all the crumbs and place inside the fridge for about 2 hours until it hardens.  Use latex gloves while decorating, cream is slippery and messy. I pipe using a large flat tip again for even layers and I try to smooth it as even as possible using a small angle spatula.  Then I use a wide scraper and smooth the cake by turning the cake stand and scraping excess uneven icing, this part took the longest.  After all layers are done, refrigerate again, I did it over night so my cake is nice and firm to move around.  After that is harden, I scrap again the sides with the scraper until it is as smooth as possible to my ability. 

Assemble time! This is the scariest part I think.  I cut 9 paper straws with lollipop sticks inside and place it into the cake as foundation.  I CAREFULLY place the cake layer on top of each other and center it .  I use a focus point so I put the best side of each tier facing that point.

 I am ready to secure my cake.  I cut a wooden stick slightly shorter than the height of the cake.  I sharpen one end and poke it through the entire height of the cake down to the base board.  Now the three tiers are forever united! After fixing the edge and some minor accidents,  my 25lb cake is born. 

Tomorrow is dress up time!!! Cannot wait!  Time Spent so far: 7 hrs

Tuesday, August 14, 2012

How to Make Juicy Sweet Corn

Corn is such an awesome vegetable, it is one of the few veges that my kids will eat.  I did some research and found that I have been cooking my corn the wrong way.  Here is what I end up doing, combining several different tips from experts. Hope you will try it and taste the difference!

1. Boil water in a large stock pot.  DO NOT PUT SALT

2. Remove Husk and break into half and place into boiling water and cover with a lid.  I have 6 ears of corn here.

3. Cook for 10 minutes only

4. Add 2 tbs of butter into boiled corn and let it melt

5. Shred 2 cups of Cheddar Cheese


6. Remove Corn from water and put a chopstick as holder


7. While corn is still hot, sprinkle cheddar cheese on top

Placing butter into the water will save you a step from doing it yourselves.  Especially when you are making corn for the whole family.  Also not putting salt in the water will prevent corn from getting tough.  I never know how long corn should cook for, I had no idea it only takes 10 minutes. 

Hope you enjoy this recipe!  My kids and I sure did! Yumolicious!

Sunday, August 12, 2012

Hong Kong Pineapple Bun Recipe 波羅包


Tips:
Working with yeast is tricky. Some day it works well, other days, it does not want to rise. But yeast is the key to a soft and airy bun. So be patient and let it rise slowly. If the temperature and humidity is not right, dough will not rise properly. Yeast is a bacteria and needs warm air, food and warm liquid to grow. That’s why warm milk and sugar is important. Once you feed them and give them a warm place to grow, they will be happy and your bread will be nice and soft and airy. Oven temperature is important too. Make sure your oven is hot enough before placing the bun in the oven. Too hot of an oven, the bun will be burnt and the inside is not cooked enough. Oven not hot enough the bun will not rise properly. To make sure the oven is in the right temperature, invest in a oven thermometer. Lastly, invest in a scale with grams and ounce. Baking is a chemistry and needs precision. Measuring accurately will ensure consistency every time you bake. I hope these tips will help you bake. Enjoy!

Pineapple Bun Recipe

Bun Ingredients:

Make 12 mini Buns
All purpose flour(Sieved) 360g
Dry Yeast 3tsp
Salt 1tsp
Sugar 3.5tsp
Melted Butter 30g
Egg Yolk 1
Warm milk 150ml (15C or 60F)
Honey 3tsp

Cookie Top Ingredients:
Sugar 80g
Butter(Soften) 50g
Egg Yolk 2
Milk 2tsp
Honey 3tsp
All Purpose Flour(sieved) 140g
Baking Powder 2tsp

Egg Wash:
Egg White 2
Milk 5tsp


Making the Buns: Takes about 3 hrs
Place flour on a clean counter top and create a large well in the middle. In a bowl combine warm milk, yeast, sugar and honey, mix well and let stand for 10mins until bubble is form. Add yeast mixture, butter and egg yolk into flour well and slowly work from the middle, combine flour to form a dough. Keep kneading until dough is smooth and not sticky to the touch. If dough is too dry, spray with a little of water. Place dough in a large bowl, cover with wet towel and let is rest in room temperature for 1.5hr or until dough double its size. It is time to prepare cookie topping. After resting, punch dough and knead again and divide dough into 12 small balls. Place on a greased sheet pan, cover with wet towel and let rest for about 30 minutes or double the size again. Then you are ready to add cookie topping.

Making Cookie Topping:
Combine butter and sugar in a bowl and mix well. Add egg yolk, milk and honey and mix well. Add remaining dry ingredients and mix into a soft dough. Wrap dough with plastic wrap and form a cylinder tube. Place in refrigerator and refrigerate until firm. About 30mins.


Time to Bake:
Preheat oven to 350F or 180C
Cut cookie topping into 12 portions and flatten it with the palm of your hands while it is still cold. If too sticky, flatten it in between two sheets of plastic wrap. Brush buns with egg wash and place cookie on top of buns. Then brush cookie topping with egg wash. Brush again just before bun is placed in the oven. After about 15mins in the oven, rotate sheet pan for even browning. Bake until golden brown and let it cool. Cookie topping will become crispy and enjoy with a big slice of butter in the middle with bun sliced in half.


Saturday, August 11, 2012

Lazy Day Nutella Molten Lava Cake


Simple and Delicious! Lazy Day Nutella Molten Lava Cake

 There are lots of lava cake recipes out there that requires quite a bit of steps and ingredients.  It is also hard to find a recipe that does not have tons of egg yolks or butter in it.  So I did my research and made my adjustments.  Even if you over cook this cake, no big deal, it will still be the most delicious Nutella brownie you have ever tasted.  Simply cannot go wrong! Perfect for date night dessert!
Ahhh! The Simple pleasure of Nutella

Pre-heat oven at 350F or 180C. Spray cooking oil and dust with flour
Ingredients: 3 egg yolk, 1 tbs butter, 1 cup Nutella, 1 tbs flour

Mix all ingredients until smooth.  Fill ramekins 2/3 full and bake in 350F or 180C oven for about 13 mins
Remove from oven when you see a crust is formed around the rim and on top.  Let cool for 5 mins and fill in with strawberries or filling of your choice. 


Scrape the side of the cake with a knife and flip over onto a plate.  Dust with powdered sugar and serve HOT!

 YUMOLICIOUS!

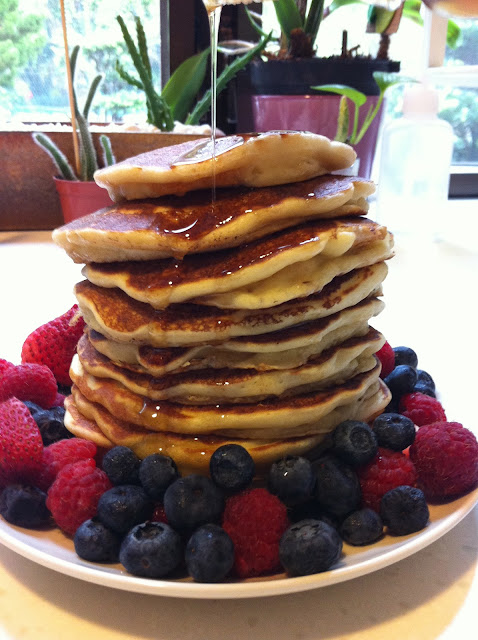
YLO's Buttermilk Pancake

Haha!!!! After researching half a dozen pancake recipe, I simplified several different version and come up with this easy to manage recipe.  

Enjoy and have a Yumolicious Breakfast!


Substitution for Buttermilk: If you don't have buttermilk, you can substitute with one cup of Yogurt, or make your own.  Add one tbs of vinegar or lemon juice to one cup of milk, do not stir and wait for 5 minutes.  It will turn into curd milk, buttermilk is basically soured milk.


Ingredients:1 cup of buttermilk, 2tbs melted butter, 1 egg, 1 cup flour, 1 tsp baking soda, 1/2 tsp salt, 1 tbs of sugar

1. Melt Butter in frying pan, reuse pan for frying pancake
2. Mix all ingredients including melted butter
3. Spoon 2 tbs of batter into low heat pan, wait for the bubbles to form.  I use the smallest flame on my stove top


4. Flip once bubbles are formed
Add Berries and 100% Maple syrup and Serve Hot!