I am relieved yet excited that my wedding cake was a huge success. The
wedding couple was very happy with the design and most of all it was a
delicious cake that everyone enjoyed.
I just wanted to recap how I decorate the cake. I used fresh flowers to decorate the cake. The couple wanted me to use baby's breath and Pink Hydrangea to decorate the cake. Since these are all small little flowers, it might not stay fresh for long periods of time. So I make sure to soak them in water at least overnight and make sure they are fresh and wait till the last minute to assemble it onto the cake. Soaking it also prevent excess dirt or pesticide from transferring to the cake.

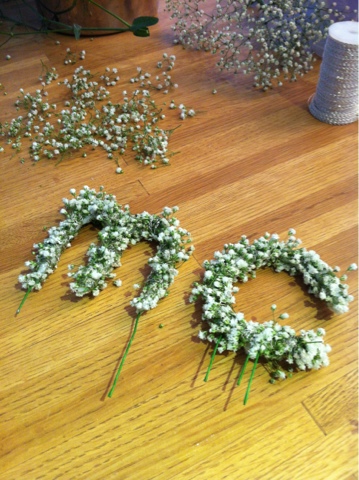
First step, I made the cake topper. I twist several 20 gauge wire into the bride and groom initials M and C. I surrounded the initials with wet cotton. Then using very fine silver wires, I secure little pieces of Baby's breath onto a initials.
Then I cut bits and pieces of Hydrangeas and place them loosely around the cake giving it an accent of light pink. I also place a thin off white ribbon on the base of each layer. But next time, I would prefer to use a thicker ribbon or fondant to surround the cake and use colors that will match with the flowers. I did not want to have too much flowers around the cake. Simple and intimate was what I have in mind.


So the cake is done, it is not over! The worse part is yet to come. DELIVERING the cake is next. In Hong Kong, we don't have office depot. It was very hard for me to find a huge sturdy and clean box for my cake. I need a 18x18x18 box to house my cake. So finally I went to the post office and found myself a box that will hold 50lbs of goods. The postman was shocked when he found out I was using it to transport a cake!
 I carefully place non skid mats in the box. Then I place my cake on a sheet pan and another mat to make sure my cake is not going anywhere during the journey. Then I place it in and closing the box and carefully place it in the trunk of my car!

I was driving so slow the whole time and next time, I will put a sign on my rear window delivering a wedding cake so people won't kill me on the road. I was so worried that the cake will move or tip over. Well everything went perfectly. 30minutes later the cake and I arrived to the venue safely.
Well, a week later and I still have some nightmares about broken wedding cakes. Else than that, I am already having other ideas to make different style of wedding cakes. So let me know if we can help!
I just wanted to recap how I decorate the cake. I used fresh flowers to decorate the cake. The couple wanted me to use baby's breath and Pink Hydrangea to decorate the cake. Since these are all small little flowers, it might not stay fresh for long periods of time. So I make sure to soak them in water at least overnight and make sure they are fresh and wait till the last minute to assemble it onto the cake. Soaking it also prevent excess dirt or pesticide from transferring to the cake.

First step, I made the cake topper. I twist several 20 gauge wire into the bride and groom initials M and C. I surrounded the initials with wet cotton. Then using very fine silver wires, I secure little pieces of Baby's breath onto a initials.
Then I cut bits and pieces of Hydrangeas and place them loosely around the cake giving it an accent of light pink. I also place a thin off white ribbon on the base of each layer. But next time, I would prefer to use a thicker ribbon or fondant to surround the cake and use colors that will match with the flowers. I did not want to have too much flowers around the cake. Simple and intimate was what I have in mind.

So the cake is done, it is not over! The worse part is yet to come. DELIVERING the cake is next. In Hong Kong, we don't have office depot. It was very hard for me to find a huge sturdy and clean box for my cake. I need a 18x18x18 box to house my cake. So finally I went to the post office and found myself a box that will hold 50lbs of goods. The postman was shocked when he found out I was using it to transport a cake!


I was driving so slow the whole time and next time, I will put a sign on my rear window delivering a wedding cake so people won't kill me on the road. I was so worried that the cake will move or tip over. Well everything went perfectly. 30minutes later the cake and I arrived to the venue safely.
Well, a week later and I still have some nightmares about broken wedding cakes. Else than that, I am already having other ideas to make different style of wedding cakes. So let me know if we can help!

